When it comes to most of our home improvement projects, I am a do-it-yourself (DIY) remodeler. You'd be surprised at just how much work you can do yourself, and how much money you can save in the process. Doing things yourself does sometimes come at a cost, though: It often takes longer. Depending on your level of experience and patience, it might or might not turn out as well as the professionals.
My husband and I are gradually replacing the single-pane, double-hung, wood-framed windows around our house. They old windows are decent, and the storm windows significantly improve both their weather- and air-resistance. But they do leak air, and they are showing their age. To date, we've replaced the windows in our home office, one of the bedrooms, and the main bathroom.
As I've worked on various projects, I've discovered that how-to blog posts and videos help me do a much better job. So I wanted to give back to the DIY community with a blog post of my own. In what follows, I take you through the steps of replacing a single-pane, double-hung, spring-loaded, wood-framed window. In place of the old window, I installed a vinyl window.
Before I begin, I want to note that I'm not an expert. I don't know a lot about replacing windows. I really only know how to replace the windows in my own house. There are probably some nuances that I'm missing. So please, take this tutorial with a "grain of salt".
= = =
When it comes to properly sizing and fitting a new window, there are several key things to know, like how to measure the old space and determine whether the existing window frame is square. I'm not going to cover how to deal with those issues. This step-by-step guide assumes you've already measured for and ordered your new window (and that it's on site!), and that you either have a square opening (we did) or that you know how to shim your new window to make it level and plumb if the frame is not square.
Tools you will need to uninstall the old window and install the new:
Crow bar, pry bar, or similar
Hammer
Drill with drill bits
Screws
Level
(Plus shims, if the frame isn't square)
(Plus shims, if the frame isn't square)
To finish the window, you'll also want sandpaper, caulk, paint, a hammer, nails, and maybe some new trim.

As I uninstall the window, I'm going to work my way through the trim, spring (or pulley), center stopper, and second spring (or pulley) -- from inside to outside. I will go through this step by step, with pictures.
I start with the window closed. The front pane is all the way down, the back pane is all the way up.

1) Remove the trim. Your trim probably looks a little different than my trim -- on my windows it's very simple, just one little piece of wood. Your trim might be much bigger or more elaborately layered over your window. It's possible (but unlikely) that you don't have any trim on your window.


2) Once the trim is removed, we have access to the metal casing that holds the spring (or pulley). For simplicity, I'm going to call these metal parts just "the spring".
While the springs definitely need to get pulled all the way out of the frame, we want to do it while keep the metal casing as neat as possible (you'll see why in just a moment).
Use your crowbar, pry bar, or similar to detach the spring from the window frame on both the top left and top right side of the window.


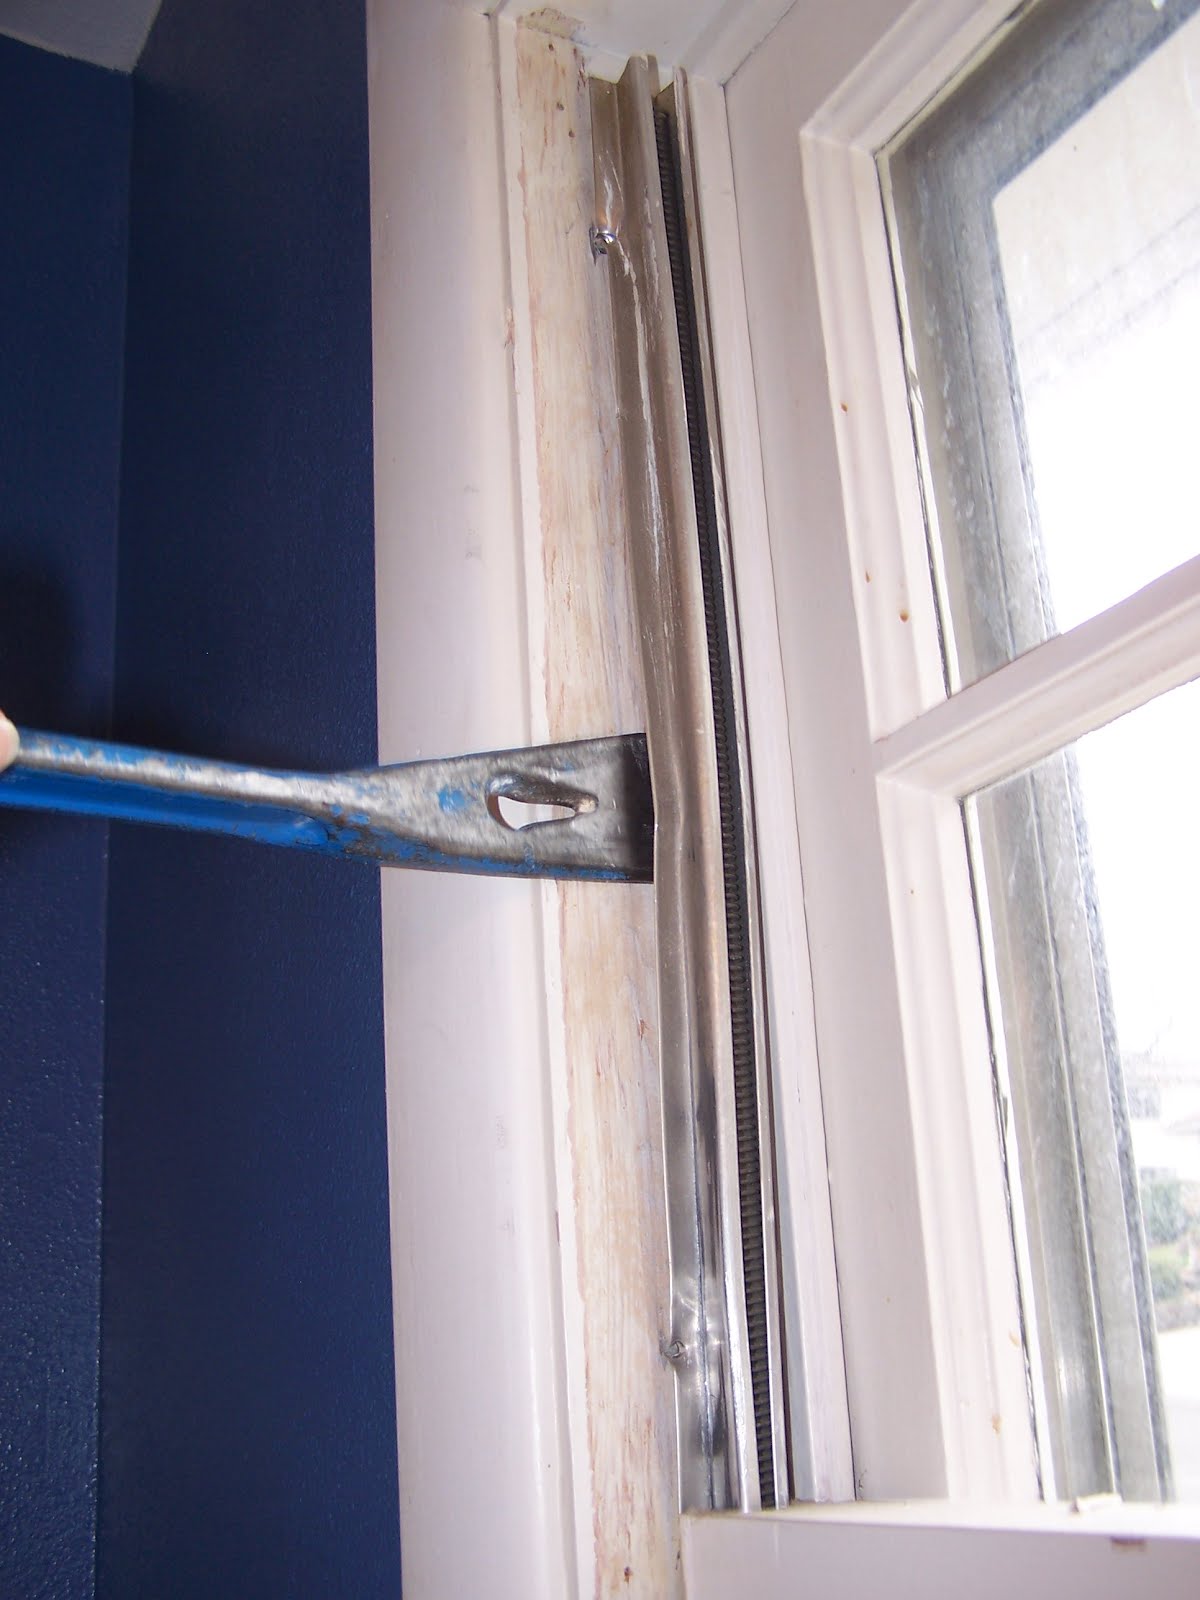
Note that there are nails on both sides of the spring's metal casing. Gently work the pry bar behind the spring to loosen these nails. (On my windows, when I work that pry bar behind the springs, the spring ends up tearing off around the nail heads, which remain embedded in the window frame. This is a bit of a pain, but I work around it and clean them up later... There's not much else I can do.)


3) Here's why it matters that we damage the metal as little as possible: After you've removed the front spring from the window frame on the top left and top right, it's time to remove the spring on the bottom left and bottom right. That means opening up the front window pane as much as possible in order to get access to the spring. The less damaged the metal, the easier this will be.
I tried to take a video as I was forcing the window open, but it was a two-handed job (yes, even for this little window). When we replaced the larger windows in one of the bedrooms, both my husband and I had to push on the window to get it to open.
 In the above picture, I've only opened the window about a third of the way. You can see the rest of the front spring (on the bottom half of the window) that I need to loosen. After some serious effort, I got the window almost all the way opened and was able to remove the spring from the woodwork on the bottom.
At this point, it doesn't matter if you mangle the spring. Just get it free from the frame!

4) After you loose both of the bottom sides, you can start pulling the window out of the frame. On this window, I'd mostly ripped the springs off of the nail heads, leaving many of them buried in the frame. This made it a bit more difficult to pull out the window, as it got caught on the nail heads. But I carefully worked it forward until the window came out. (Okay, I probably gave it a few good, violent tugs when it was really stuck.) The key is to make sure that all of the nails holding down the spring were removed -- even one still-attached nail will really make things difficult!


Great! Now that the front pane of the double-hung window has been removed, here is the window frame:

The next step is to remove the "stops" in the middle of the window.

5) I ran into something new with this window: The "back" half of the window (the back pane, pun intended) had a section that overlapped the center stops. (On bedroom windows, there wasn't an overlapping piece. We just pulled out the stops -- pun intended again! -- and then got to work on the back half of the window.) Since this overlapping bit is in the way of removing the center stops, the only thing I could think of was to rip it off the window...


6) After the overhanging piece comes off, you can remove the center stops. The picture below makes it look like I just pulled out the stops, but in reality I had to use the pry bar and the hammer to get it loose. But hey, maybe your stops will just lift right out, like magic! :o)


(See the hole where the stop was located?)

7) This step will be familiar: It's time to loosen the second set of springs. Since the back half of the double-hung window was up, I first loosened the bottom left and bottom right springs. Again, there are nails on the front and back of the spring, and you want to mangle things as little as possible.


The bottom springs are free. Next you have to open the window (in this case, it opens downward), forcing the window over the freed springs, so that you have access to the upper half of the springs. Loosen them up then yank out the window.

 In the above picture, I've only opened the window about a third of the way. You can see the rest of the front spring (on the bottom half of the window) that I need to loosen. After some serious effort, I got the window almost all the way opened and was able to remove the spring from the woodwork on the bottom.
 At this point, it doesn't matter if you mangle the spring. Just get it free from the frame!

4) After you loose both of the bottom sides, you can start pulling the window out of the frame. On this window, I'd mostly ripped the springs off of the nail heads, leaving many of them buried in the frame. This made it a bit more difficult to pull out the window, as it got caught on the nail heads. But I carefully worked it forward until the window came out. (Okay, I probably gave it a few good, violent tugs when it was really stuck.) The key is to make sure that all of the nails holding down the spring were removed -- even one still-attached nail will really make things difficult!


Great! Now that the front pane of the double-hung window has been removed, here is the window frame:

The next step is to remove the "stops" in the middle of the window.

5) I ran into something new with this window: The "back" half of the window (the back pane, pun intended) had a section that overlapped the center stops. (On bedroom windows, there wasn't an overlapping piece. We just pulled out the stops -- pun intended again! -- and then got to work on the back half of the window.) Since this overlapping bit is in the way of removing the center stops, the only thing I could think of was to rip it off the window...


6) After the overhanging piece comes off, you can remove the center stops. The picture below makes it look like I just pulled out the stops, but in reality I had to use the pry bar and the hammer to get it loose. But hey, maybe your stops will just lift right out, like magic! :o)


(See the hole where the stop was located?)

7) This step will be familiar: It's time to loosen the second set of springs. Since the back half of the double-hung window was up, I first loosened the bottom left and bottom right springs. Again, there are nails on the front and back of the spring, and you want to mangle things as little as possible.


The bottom springs are free. Next you have to open the window (in this case, it opens downward), forcing the window over the freed springs, so that you have access to the upper half of the springs. Loosen them up then yank out the window.

Ta-da! Both halves of the double-hung window are free.
8) In addition to the side stops that we took out in step 6, there is usually also an upper stop. Depending on the configuration of your window, you might have to remove the upper stop before you can take out the back half of your window. In this tutorial, I'm suggesting that you remove the top stop now, as step 8. But take a look at your window -- you might have to change the order of these instructions and do step 6, step 8, step 7, step 9. However it works out, the top center stop needs to come out.


9) Our windows also had metal strips at the top and bottom which I'm going to refer to as flanges. To take out the top flange, we definitely had to first remove the top center stop; the bottom flange could have been removed a couple of steps ago. Again, however it works for you, these pieces need to be removed. Carefully work that pry bar under the flange and get it loose. BUT BE AWARE: There's another set of stops in the window, the front stops. These should not be removed. If your top flange is like mine, it's tucked under the front stop, so you have to be careful when loosening the flange -- you don't want to remove the front stop.


The bottom flange on our window is tucked under a little piece of trim. For this window removal, we decided to remove this block of trim. (When we did the bedroom windows, we did not remove the block.) Whether or not you need to remove the block will depend entirely on your window configuration.


Here's the bottom of the window, with the metal flange and trim piece removed:

(We also had storm windows on our house. I didn't detail removing the storm windows. For us it was as easy as using the drill to remove a half dozen screws, but I don't know enough about storm windows to say if that's always the way of things.)
Here's the window opening, now that we've removed the trim, the front springs and window, the center stop, and the back springs and window. Note that the front stops are still in place -- you don't want to take those out!

You need to do a little cleanup at this point, before installing the new window. I'm planning to repaint all of the trim, so this is a very good time to do all of the sanding and prep work. I suppose if you have enough time and don't mind a gaping hole in the house, you could put a fresh coat of primer on the window frame as well. But if you're not making many changes, then just dust out the sill and continue the installation.
(You can see the front stops better in the picture below. I'd like to note for the umpteenth time that those don't come out! Can you tell we maybe learned this the hard way on one of our windows? Whoops.)

Whether or not you're planning to paint, you might still need to do some other work to get the frame ready for the new window. When I ripped the springs out, a lot of the nail heads stayed in the frame (the spring just pulled out around the nail head.) For the most part, I couldn't get the nails out of the frame, so I just grabbed a nail driver and pounded them deep into the wood.

I don't know a whole lot about installing windows. I know how to slide a vinyl window into a square, level hole and drill it into place. If the window frame is imperfect or the window is complicated, I don't have any advice. But here's a quick overview of how I installed this vinyl window:
10) Put the new window in the opening. If it's a snug fit, this might require a bit of muscle and some prayers. (My biggest fear with window replacements is ordering a window that's too large. Obviously we'd figure out how to make the frame wider and get it all to work, but oh gosh, I don't ever want to have that headache.) The new window will press against those front stops that I've continually warned you to not touch. The front stops keep the window from falling out of the frame! Before you screw the window in place, use your level to make sure it's level and plumb.
When we ordered the windows for the bedroom, we measured incorrectly and ended up with windows that were about half an inch smaller than the opening. This left a wide gap at the top of the window -- arg!!! We used low-expanding spray foam insulation to seal the top of the window. On both the outside and inside we then had to add a piece of trim wood in order to cover up the gap and the foam. It was a royal pain. The lesson: Make sure you measure correctly. If you don't know how, get help.
We learned our lesson (it was because of that danged block of trim wood along the bottom of the window that we measured wrong on the bedroom windows), and the bathroom window is perfect. So let's get back to it...
11) These windows came with holes pre-drilled in the vinyl. But the top holes were in the wrong place. Whoops to the manufacturer. So we had to add holes on the top. Some windows (the bedroom) don't come with any pre-drilled holes. Also, the placement of the holes will vary depending on whether it's a double-hung or single-hung window.
For this window, as I said, I had to add holes to the top. First I used my 1/8" bit to drill through the vinyl and into the wood frame. These windows have two layers of vinyl, with an air pocket in between.

12) If you were to put a screw in the window at this point, the head of the screw would be in the way of the window opening and closing. So I used a bigger drill bit to make the hole wider through the first layer of vinyl. This is important. You want the hole in the first layer of vinyl to be large enough for the head of the screw to pass through it, so that the screw head rests on the second layer of vinyl. (The screw should be "nested" between the layers of vinyl.)

13) Install your screws. For this window, I just put one screw on each side of the top and bottom. (In the bedroom, which has bigger windows, we also did a screw in the middle of the frame.)

The bedroom windows came with nice, little white covers that go over the screw holes; these windows did not come with the little plastic covers. Next time I am at the hardware store I am going to see if I can find some of them for this window. They add a nice finishing touch.
14) Now that the new window is installed, it's time to do the finishing work. Insulate, if needed. Definitely caulk, inside and out. (Re)install trim. Paint.

In the above picture, I haven't completed step 14. :o)
5 comments:
You are very handy when it comes to DIY remodeling, B. Replacing windows is not an easy task. But since you and your husband are working on it, it’ll be simple for the two of you. Your step-by-step process is also helpful guide for DIY remodeler. Your new window looks great!
*Nancy Ferdinand
It is always good to have friends who help out when you are doing something because it does not only make the work faster, but it also make the whole experience enjoyable. And it is nice of David to teach Brad his skills. I think Brad only needs time until he can apply these skills like David. Anyway, I hope the window project has turned out well. Based from the photos, it has progressed quite well!
I agree with Mac. Windows have a lot to do with your monthly utility cost. There are energy-saving window types that you may want to try, if you have another window that needs replacement. There are those that have superior thermal performance built into the frames. Others have high condensation resistance rating, and that means the window is better at preventing the formation of condensation.
Sierra Nordgren
Window installation can be quite challenging. But you can make it much easier and. Tip: when you remove the frame of the old window, make sure not to damage the flashing around the edges of the opening. If you do so or if it has been damaged before the removal, it should be replaced too. The window flashing is an important part of the window because it helps prevent water intrusion.
You definitely have to get the exact measurements of the window you want to replace if you don’t want to end up having cracks peeking out from the sides of your windows. That was a pretty smart idea to cover up the gap using low-expanding spay foam insulation, but I imagine you did have your work cut out for you that day. The best thing to do when you’re replacing your windows is probably to just take your time. Make sure you got the right materials and the right measurements before buying anything. That way, you don’t spend money you need not spend in the first place.
Post a Comment