Nate was gone last night, on a campout with the young men from church. There was a time when I didn't mind this kind of thing, I didn't even blink. I would stay up late with a sappy teen vampire romance (oh yeah!) or do something crafty or whatever. Whatever I wanted. And it was fine. But now there's a little baby in the house, and when he's gone I become a very un-me, perpetually frightened woman. I worry that someone bad is going to try and attack us or that a catastrophe will strike, and that either baby or I will be in danger. So I go around the house and apply all three locks to every door (there really are at least three locks on every external door in the house -- a paranoia present from the previous owners). Then I toss and turn in my bed, worrying, struggling to sleep.
Last night wasn't too bad. With all of the locks applied to all of the doors I didn't feel too worried, and I only tossed around in bed for maybe ten minutes before I settled in to sleep...
Still, it's a strange new personality quirk and I'm not a fan. I'd like to have my fearless, carefree self back, thankyouverymuch.
Overall, I think the sleep situation in our house has vastly improved. We've been doing "cry it out" for more than a week now and I am happy to report that it is working -- Baby Girl is learning to sleep on her own. We've had a few hiccups and it has been hard, but worthwhile...
Last night, for instance, Darling cried for about 15 minutes when I first put her down. So I went to check on her, gave her a little cuddle, and put her back in her crib. Then I hovered and hummed for a few minutes until she closed her eyes. (This is a little tip I picked up from watching my mom this week, that it comforts the baby just to have someone watching over her; thus baby is still putting herself to sleep, just with the comforting knowledge that mommy isn't far away. Much kinder and easier on all of us. Thanks mom, you're brilliant as usual! I think it generally helps to let Baby Girl cry for a few minutes before I come back in to do the hover/hum.) When I sneaked out of Darling's room last night, I roused her with the click of the door closing, but she cried for only a minute before settling down so I didn't have to go in again. THEN she slept for nearly 10 hours, which means I got a 7-hour stretch. Hallelujah.
Even though she woke up at 5am, she was back to sleep before 6am and slept for another two hours. It was bliss. I enjoy having a brief early-morning sleep/cuddle with my baby.
Tonight when I put her down she didn't cry at all. She fussed a little bit, but I hover/hummed for a couple of minutes and she passed out happily. According to friends who have endured this cry-it-out period with their children, it takes 2-3 weeks and then she will be in a good routine. So... one week down. One or two to go. To reiterate, it has been worth the struggle from our perspective.
Another thing I mentioned in last week's post was the new baby backpack that we ordered, the Ergo. It came yesterday (Friday)! I'm glad I got the gray one with stars on it because it is CUTE and I love it. We used it just a little bit yesterday, then again for awhile today. I used it in the afternoon for about an hour when I was working in the garden. Nate used it later in the evening when we went out to do a little more yard work. It's awesome! I'm much more productive with the baby on my back. She definitely enjoys it, too.
We moved about half a dozen loads of weeds and branches out of the garden today. There's maybe a couple more loads to go and it will be cleared, ready for tilling and top soil. We were on target to get it cleared today, but then Nate broke the shovel. Ha. This is probably the third shovel he's broken in the last three years; I guess he just doesn't know his own strength! It's hard when you're nothing but muscle. Teehee. It was about time for us to wrap up anyway, as I needed to get dinner out of the slow cooker and make something for the baby. (We had chicken in a tomato/broccoli sauce; I pureed some of the chicken and broccoli with some milk for Darling. Everyone enjoyed dinner. Baby Girl even had extra chicken... she just kept opening her mouth and eating! It was a new experience -- usually I can't even get her to eat the one tablespoon of food I make, but tonight she wanted more and more. Awesome.)
This week I continued to research Stage 2 car seats, and I am no closer to making a decision than I was last week. I now have a ton of information, some of it contradictory, floating around in my head. It's very confusing, trying to figure out which seat to get. Nate and I went to the store just so we could play with a couple of brands; we found that there were things we liked and disliked about nearly every make and model. Part of me wishes that someone would just tell me what to buy, or maybe even just show up with a car seat. That was how we ended up with our infant car seat -- a co-worker offered to give it to us, I was told by several people that it is an excellent car seat, and viola! Done. And I could not have picked a better infant car seat on my own, so it worked out really well, even.
Switching gears a little bit, here's an update about work: I just finished conducting a survey of local employers and I am writing a report about the survey results. It's not a big report (maybe 8-10 pages) but it's important to the uber boss. The whole survey and report was his brainchild, and he's very excited. I've created most of the charts and graphs -- that's the easiest part. I have one "chapter" (about two pages) finished, and I've outlined the rest of the chapters. It's due at the end of next week; I'm confident it will be done on time. But I'm also worried about it. Like I said, the report is important to the uber boss. And I really like the uber boss. Not only is he an incredible manager and leader, he's also a really, really great person, and I don't want to disappoint him. He had my back a couple of times last year when I needed some support. He's put a lot of faith in me. I want to prove that his faith and support are well-placed. I know the report will be great when all is said and done, so I guess... I just hope it lives up to his expectations.
I think that's just about all of the news-worthy happenings in our house, so I am going to grab a piece of toast and watch some a few minutes of some sappy teen vampire drama before I have to go to bed. :o)
Saturday, April 28, 2012
Saturday, April 21, 2012
This time, it's all about the baby
I wrote a whole post last night about how we've decided to let Baby Girl cry it out at bedtime. For a few minutes, I even made the post public. But after reading it over, I felt like it was a tad too personal for this public forum. I don't mind talking about the events going on in our lives, but the post was really about all of our convoluted feelings and the inner turmoil of making this decision, and I didn't/don't feel like making those intimate thoughts so broadly known. So I'll boil it down: We decided it's time to let Baby Girl "cry it out" at bedtime. I wasn't sure if I was ready for this step, and I have a lot of mixed (mostly bad) feelings about it, but two things happened that changed my mind...
(1) I talked to a co-worker who shared her experience with her first daughter (now 3 years old). They didn't want to let her "cry it out" so they continued to nurse/rock/cuddle/etc. their daughter to sleep until she was 18 months old. She was a terrible sleeper and never, ever went to bed on her own. They finally decided it was finally time for her to learn to put herself to sleep, and apparently the first night it took her five hours (FIVE!) to go down. Because she could talk, she was screaming mommy and daddy and saying things like, "I need you!" Ohhhh that sounds like torture. (They started "sleep training" their second daughter at about 8 or 9 months -- she's now 18 months and a very good sleeper. Puts herself to bed, and stays asleep at night.)
(2) We had a long week of poor sleep. The pediatrician said that Baby Girl will sleep better after she learns to put herself to sleep, and frankly, we all need to sleep better. I can't keep doing this up-and-down for two hours every evening, get nothing done, up-and-down three times a night, exhausted and cranky during the day routine. Ugh.
Thus yesterday (Friday) night was long and difficult. But for all of my bad, sad, worried feelings, I also felt very strongly that it was the right thing to do. I felt comfort from the Holy Spirit that it was okay, and the right decision. (I'm not trying to speak for anyone else here or tell anyone how to do things -- this is just my experience, my perspective.) Tonight she fell asleep faster than she did yesterday, and she has stayed asleep.
I'll report more when there's more to say; I hope by next weekend's post I'll be able to report tearless bedtimes and long stretches of sleep.
So, what else is new with the baby? Glad you asked...
We finally got a high chair. (I say we, but really this is one of those things -- both the final decision and the delay -- that is all on me.) It is just plain ridiculous how long it took to finally make up my mind and buy one. We had Baby Girl in her Bumbo on the dinner table for ages. We ended up getting a space-saver high chair. Specifically, it's this one:

I saw it last year (on Amazon -- I love Amazon!) and wanted to get it, but balked at the cost. Turns out that high chairs are expensive. When the new year came, the above chair disappeared from Amazon. Apparently it was a 2011 model and it looked like they weren't going to make it in 2012. Three months went by and suddenly, when I was checking my Amazon wish list one afternoon, there it was! And for $4 less than it cost in December. What's more, I got to see one of the space saver chairs up close while visiting a good friend from church. Baby Girl got to test out the high chair and seemed to like it.
My one complaint is that the padding is not very fluffy. My friend's chair has cushy, thick pads on it. This one has a very thin pad. But on the bright side, this pad is very easy to remove and wash. It would also be very easy to replicate the pattern and make my own pad (which I'll want to do it we have a boy sometime).
Speaking of the need to buy expensive things: Stage 2 car seats. Oh my gosh. How could my baby be big enough to need a new carseat already?! She's still within the weight restrictions (she's just over 21 pounds and they go up to 30) but she is maxing out the height restriction (28 of 29 inches). So now we have to research and shop around for a new car seat. I was chatting with a new-parent co-worker this week and they just got a stage 2 seat. He argued that they should have picked up a stage 2 seat in the beginning -- gotten the kind that goes from 5 to 100 pounds (like an Alpha Omega). Then he wouldn't need to buy two. I reminded him that they're going to have another kid at some point, and Baby 1 will be using the Stage 2 car seat, so Baby 2 will need the infant car seat. Point to me. :)
Anyway, all of that is to say, yowza. I can't believe it's nearly time to upgrade.
Another recent upgrade (does this list ever end?!) was in baby-wearing gear. For many months now we've been using and loving the Baby Bjorn. Actually, I should rephrase. Somewhere around 17 pounds, Baby Girl got a little bit too heavy for me to wear in the Bjorn. Nate has forged ahead, but she wears him out -- ha, ha -- pretty quickly. There's still a big need for baby-wearing in our house, however; we're very active people. So I started asking around about baby backpacks and learned that the Ergo is a good choice. I borrow one from that same recent-parent co-worker/friend, and we like it. We ordered one from REI. It's on backorder -- should be here in another week or two. I got the really cute one with stars on it, oh yeah!

In the meantime, we have a Snugli "Serenade" baby backpack. (I tried to find a picture online but it looks like they stopped making the Serenade, and their current products look a lot different from the one we were given.) It's not a very good backpack -- puts all of baby's weight on the shoulders -- but it gets my hands free and that's important. Today I used it while doing some shoveling in the backyard. Oh, it was such a help! Then Nate came out and set up our 2-man tent and brought a basket of toys, so Baby Girl crawled around in there for an hour and we talked to her while we did yard work.
Baby Girl discovered her "mmmmmm"s this week. On Wednesday afternoon she suddenly started saying "ma ma ma ma ma ma ma". Oh man, even though she doesn't know what she's saying and isn't calling me mama or anything, it still gives me such a thrill! Really warms my heart. Unfortunately "ma ma ma" is her preferred sound for expressing frustration. So if I leave her in her high chair too long or is she gets tired and cranky, she'll start throwing out very aggressive "ma ma ma ma ma"s.
This paragraph is going to be about poop. If you don't want to read about baby poop (mom), skip to the next paragraph. I'm sure my other new-mother friends (Amy, you especially; and Anne and Kimmy) will totally understand the reason I am talking about poop. Every little noise and bodily function is fascinating and significant to me! I'm mom! I made all of those little parts that do all of those little things, and they are taking new directions of their own accord! It's amazing!!! Darling's poops have become much more like real poop. It's gross, but exciting. Seriously, her little poops are really little turds now, not just massive diarrhea splashes. This means her diapers are actually easier to change, so long as it's not a big poop and I catch it soon enough. (If she's had time to squirm around, well... you can imagine.) But the downside is that, oh my gosh, they stink! They smell like real, grown-up poops. Yuck. When does potty training start? Do I have to wait until she can walk? Ha. :)
Hmm. I just looked at the clock and it's well past nine. I don't want to wrap it up (I didn't talk about elephant hunts or the importance of calcium or any of the non-baby things on my list!) but I really should call it a night. So I will save the other items for another post... probably next weekend. In the meantime, have a good one, and stay safe!
(1) I talked to a co-worker who shared her experience with her first daughter (now 3 years old). They didn't want to let her "cry it out" so they continued to nurse/rock/cuddle/etc. their daughter to sleep until she was 18 months old. She was a terrible sleeper and never, ever went to bed on her own. They finally decided it was finally time for her to learn to put herself to sleep, and apparently the first night it took her five hours (FIVE!) to go down. Because she could talk, she was screaming mommy and daddy and saying things like, "I need you!" Ohhhh that sounds like torture. (They started "sleep training" their second daughter at about 8 or 9 months -- she's now 18 months and a very good sleeper. Puts herself to bed, and stays asleep at night.)
(2) We had a long week of poor sleep. The pediatrician said that Baby Girl will sleep better after she learns to put herself to sleep, and frankly, we all need to sleep better. I can't keep doing this up-and-down for two hours every evening, get nothing done, up-and-down three times a night, exhausted and cranky during the day routine. Ugh.
Thus yesterday (Friday) night was long and difficult. But for all of my bad, sad, worried feelings, I also felt very strongly that it was the right thing to do. I felt comfort from the Holy Spirit that it was okay, and the right decision. (I'm not trying to speak for anyone else here or tell anyone how to do things -- this is just my experience, my perspective.) Tonight she fell asleep faster than she did yesterday, and she has stayed asleep.
I'll report more when there's more to say; I hope by next weekend's post I'll be able to report tearless bedtimes and long stretches of sleep.
So, what else is new with the baby? Glad you asked...
We finally got a high chair. (I say we, but really this is one of those things -- both the final decision and the delay -- that is all on me.) It is just plain ridiculous how long it took to finally make up my mind and buy one. We had Baby Girl in her Bumbo on the dinner table for ages. We ended up getting a space-saver high chair. Specifically, it's this one:
I saw it last year (on Amazon -- I love Amazon!) and wanted to get it, but balked at the cost. Turns out that high chairs are expensive. When the new year came, the above chair disappeared from Amazon. Apparently it was a 2011 model and it looked like they weren't going to make it in 2012. Three months went by and suddenly, when I was checking my Amazon wish list one afternoon, there it was! And for $4 less than it cost in December. What's more, I got to see one of the space saver chairs up close while visiting a good friend from church. Baby Girl got to test out the high chair and seemed to like it.
My one complaint is that the padding is not very fluffy. My friend's chair has cushy, thick pads on it. This one has a very thin pad. But on the bright side, this pad is very easy to remove and wash. It would also be very easy to replicate the pattern and make my own pad (which I'll want to do it we have a boy sometime).
Speaking of the need to buy expensive things: Stage 2 car seats. Oh my gosh. How could my baby be big enough to need a new carseat already?! She's still within the weight restrictions (she's just over 21 pounds and they go up to 30) but she is maxing out the height restriction (28 of 29 inches). So now we have to research and shop around for a new car seat. I was chatting with a new-parent co-worker this week and they just got a stage 2 seat. He argued that they should have picked up a stage 2 seat in the beginning -- gotten the kind that goes from 5 to 100 pounds (like an Alpha Omega). Then he wouldn't need to buy two. I reminded him that they're going to have another kid at some point, and Baby 1 will be using the Stage 2 car seat, so Baby 2 will need the infant car seat. Point to me. :)
Anyway, all of that is to say, yowza. I can't believe it's nearly time to upgrade.
Another recent upgrade (does this list ever end?!) was in baby-wearing gear. For many months now we've been using and loving the Baby Bjorn. Actually, I should rephrase. Somewhere around 17 pounds, Baby Girl got a little bit too heavy for me to wear in the Bjorn. Nate has forged ahead, but she wears him out -- ha, ha -- pretty quickly. There's still a big need for baby-wearing in our house, however; we're very active people. So I started asking around about baby backpacks and learned that the Ergo is a good choice. I borrow one from that same recent-parent co-worker/friend, and we like it. We ordered one from REI. It's on backorder -- should be here in another week or two. I got the really cute one with stars on it, oh yeah!
In the meantime, we have a Snugli "Serenade" baby backpack. (I tried to find a picture online but it looks like they stopped making the Serenade, and their current products look a lot different from the one we were given.) It's not a very good backpack -- puts all of baby's weight on the shoulders -- but it gets my hands free and that's important. Today I used it while doing some shoveling in the backyard. Oh, it was such a help! Then Nate came out and set up our 2-man tent and brought a basket of toys, so Baby Girl crawled around in there for an hour and we talked to her while we did yard work.
Baby Girl discovered her "mmmmmm"s this week. On Wednesday afternoon she suddenly started saying "ma ma ma ma ma ma ma". Oh man, even though she doesn't know what she's saying and isn't calling me mama or anything, it still gives me such a thrill! Really warms my heart. Unfortunately "ma ma ma" is her preferred sound for expressing frustration. So if I leave her in her high chair too long or is she gets tired and cranky, she'll start throwing out very aggressive "ma ma ma ma ma"s.
This paragraph is going to be about poop. If you don't want to read about baby poop (mom), skip to the next paragraph. I'm sure my other new-mother friends (Amy, you especially; and Anne and Kimmy) will totally understand the reason I am talking about poop. Every little noise and bodily function is fascinating and significant to me! I'm mom! I made all of those little parts that do all of those little things, and they are taking new directions of their own accord! It's amazing!!! Darling's poops have become much more like real poop. It's gross, but exciting. Seriously, her little poops are really little turds now, not just massive diarrhea splashes. This means her diapers are actually easier to change, so long as it's not a big poop and I catch it soon enough. (If she's had time to squirm around, well... you can imagine.) But the downside is that, oh my gosh, they stink! They smell like real, grown-up poops. Yuck. When does potty training start? Do I have to wait until she can walk? Ha. :)
Hmm. I just looked at the clock and it's well past nine. I don't want to wrap it up (I didn't talk about elephant hunts or the importance of calcium or any of the non-baby things on my list!) but I really should call it a night. So I will save the other items for another post... probably next weekend. In the meantime, have a good one, and stay safe!
Friday, April 13, 2012
Yes, you can sleep on my pillow.
The sleeping turmoil with the baby continues. Last week we got two really good nights of sleep out of her, on Friday and Saturday nights. Friday I rocked her for half an eternity, then put her down in the pack-n-play in my bedroom. As I watched her sleeping for a minute, the thought came to me, put her in her own bed. I brushed it off; she didn't look like she was sleeping deeply enough to be moved to her room. Even if she did make it to her bed, she'd wake up the moment I put her down in the crib. Plus she wouldn't stay asleep in her own bed.
But again the thought came to me, put her in her crib tonight. Move her right now. Sigh. The feeling was pretty strong. So I transferred her to her own room, to her crib, and she actually continued to sleep. In fact, she slept for three hours. I got her up to feed her then went to bed myself, and she slept for another six hours straight. Whoa. Even I can't sleep that long anymore -- I got up twice and went to check on her. Apparently her dad was also up a time or two. After waking up and nursing at 4am, she went back to sleep for another three hours. Amazing.
The next night, similar story.
But then it was Sunday night, and her nap schedule was weird during the day because of church, and she didn't sleep well that night. Or Monday night. On Tuesday a runny nose popped up, so Tuesday night was miserable. Poor baby was full of phlegm, which would gradually build up until it suffocated her a little bit, which would cause her to wake up. The abrupt waking and difficulty breathing made her scream, which woke us immediately and propelled us out of bed. Once or twice I rocked her while she screamed for awhile (which is entirely uncharacteristic of my kid). All told, it was a night of very little sleep.
Wednesday she was still sickly (I don't know if it's a cold or if it's from teething; cold be either or both). Baby Girl is at the point now where she rolls a lot in her sleep and often ends up on her face, so I can't prop her up on a pillow. My wise MIL advised me to put a couple of pillows under her mattress so that the whole mattress is angled. Brilliant idea, but unfortunately Darling was just too sick for it to fully work.
When she woke up in the middle of the night on Wednesday, I just brought her to my bed and propped her up on my arm. But she made my arm cramp and fall asleep. So I ended up putting her little head on my pillow, next to my own head; her little face pressed up against my face. As you can probably imagine, it was very sweet. It was nice being able to kiss and nuzzle her. It was still difficult to sleep, though. I was worried about her rolling off of my pillow, getting smothered, being crushed, etc. She's probably safer when she's up on my pillow than when she's at my side, but still, I worried.
Last night (Thursday), same story. Except much less sleep. There was a very long period of crying during the 4 o'clock hour. Eventually dad took Baby Girl to the nursery and rocked her for awhile; she slept in his arms but awoke when transferred to the crib. So she came back to bed, screamed a little bit more, and slept on my pillow again.
Right now she's asleep in the pack-n-play. She's been up twice since we put her down at 7pm. The first time she was rocked back to sleep by her dad, the second time I cuddled her in our bed while I did some reading. She sounds okay over there -- doesn't sound too congested. She's been in the pack-n-play for about an hour. I'm really hoping she will give me one of those glorious 6-hour stretches and then another 2-3 hour stretch tonight. I could really use the sleep!
Hopefully I'll have better news tomorrow. (Hopefully I'll have time to write tomorrow!)
Tuesday, April 10, 2012
How to replace a double-hung wood window
When it comes to most of our home improvement projects, I am a do-it-yourself (DIY) remodeler. You'd be surprised at just how much work you can do yourself, and how much money you can save in the process. Doing things yourself does sometimes come at a cost, though: It often takes longer. Depending on your level of experience and patience, it might or might not turn out as well as the professionals.
My husband and I are gradually replacing the single-pane, double-hung, wood-framed windows around our house. They old windows are decent, and the storm windows significantly improve both their weather- and air-resistance. But they do leak air, and they are showing their age. To date, we've replaced the windows in our home office, one of the bedrooms, and the main bathroom.
As I've worked on various projects, I've discovered that how-to blog posts and videos help me do a much better job. So I wanted to give back to the DIY community with a blog post of my own. In what follows, I take you through the steps of replacing a single-pane, double-hung, spring-loaded, wood-framed window. In place of the old window, I installed a vinyl window.
Before I begin, I want to note that I'm not an expert. I don't know a lot about replacing windows. I really only know how to replace the windows in my own house. There are probably some nuances that I'm missing. So please, take this tutorial with a "grain of salt".
= = =
When it comes to properly sizing and fitting a new window, there are several key things to know, like how to measure the old space and determine whether the existing window frame is square. I'm not going to cover how to deal with those issues. This step-by-step guide assumes you've already measured for and ordered your new window (and that it's on site!), and that you either have a square opening (we did) or that you know how to shim your new window to make it level and plumb if the frame is not square.
Tools you will need to uninstall the old window and install the new:
Crow bar, pry bar, or similar
Hammer
Drill with drill bits
Screws
Level
(Plus shims, if the frame isn't square)
(Plus shims, if the frame isn't square)
To finish the window, you'll also want sandpaper, caulk, paint, a hammer, nails, and maybe some new trim.

As I uninstall the window, I'm going to work my way through the trim, spring (or pulley), center stopper, and second spring (or pulley) -- from inside to outside. I will go through this step by step, with pictures.
I start with the window closed. The front pane is all the way down, the back pane is all the way up.

1) Remove the trim. Your trim probably looks a little different than my trim -- on my windows it's very simple, just one little piece of wood. Your trim might be much bigger or more elaborately layered over your window. It's possible (but unlikely) that you don't have any trim on your window.


2) Once the trim is removed, we have access to the metal casing that holds the spring (or pulley). For simplicity, I'm going to call these metal parts just "the spring".
While the springs definitely need to get pulled all the way out of the frame, we want to do it while keep the metal casing as neat as possible (you'll see why in just a moment).
Use your crowbar, pry bar, or similar to detach the spring from the window frame on both the top left and top right side of the window.


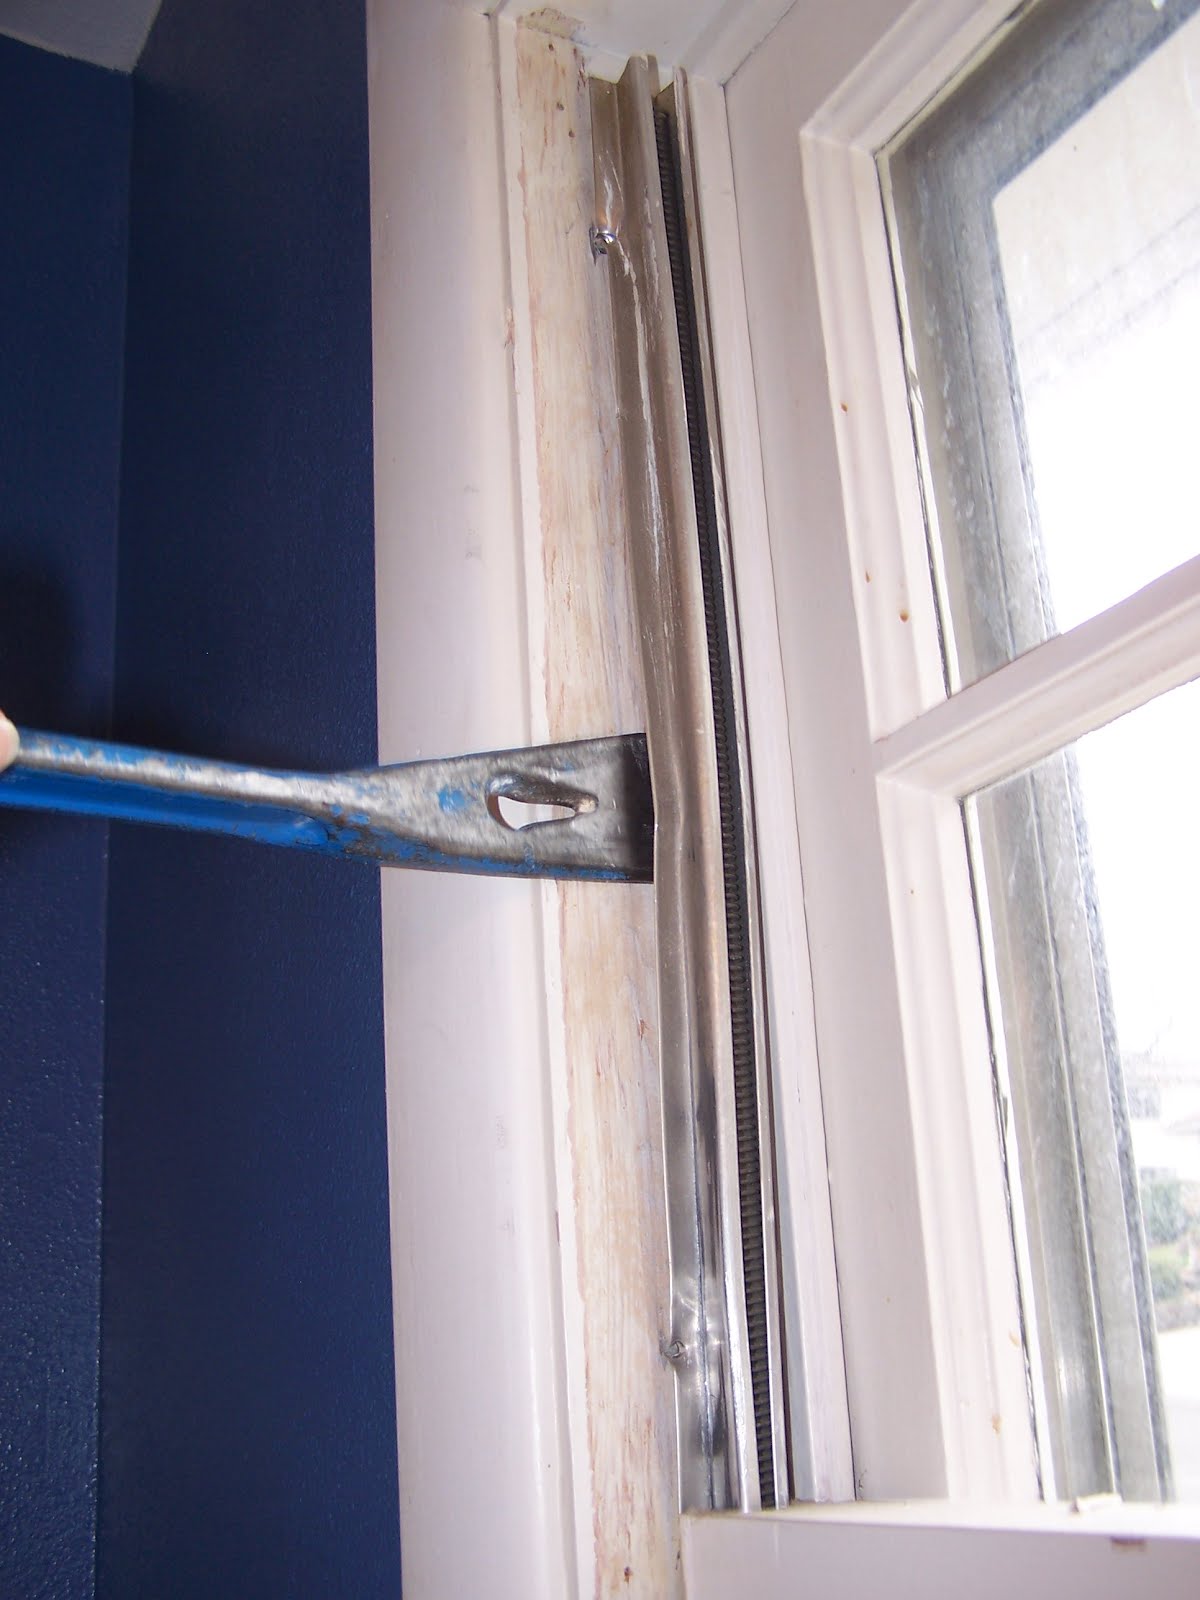
Note that there are nails on both sides of the spring's metal casing. Gently work the pry bar behind the spring to loosen these nails. (On my windows, when I work that pry bar behind the springs, the spring ends up tearing off around the nail heads, which remain embedded in the window frame. This is a bit of a pain, but I work around it and clean them up later... There's not much else I can do.)


3) Here's why it matters that we damage the metal as little as possible: After you've removed the front spring from the window frame on the top left and top right, it's time to remove the spring on the bottom left and bottom right. That means opening up the front window pane as much as possible in order to get access to the spring. The less damaged the metal, the easier this will be.
I tried to take a video as I was forcing the window open, but it was a two-handed job (yes, even for this little window). When we replaced the larger windows in one of the bedrooms, both my husband and I had to push on the window to get it to open.
 In the above picture, I've only opened the window about a third of the way. You can see the rest of the front spring (on the bottom half of the window) that I need to loosen. After some serious effort, I got the window almost all the way opened and was able to remove the spring from the woodwork on the bottom.
At this point, it doesn't matter if you mangle the spring. Just get it free from the frame!

4) After you loose both of the bottom sides, you can start pulling the window out of the frame. On this window, I'd mostly ripped the springs off of the nail heads, leaving many of them buried in the frame. This made it a bit more difficult to pull out the window, as it got caught on the nail heads. But I carefully worked it forward until the window came out. (Okay, I probably gave it a few good, violent tugs when it was really stuck.) The key is to make sure that all of the nails holding down the spring were removed -- even one still-attached nail will really make things difficult!


Great! Now that the front pane of the double-hung window has been removed, here is the window frame:

The next step is to remove the "stops" in the middle of the window.

5) I ran into something new with this window: The "back" half of the window (the back pane, pun intended) had a section that overlapped the center stops. (On bedroom windows, there wasn't an overlapping piece. We just pulled out the stops -- pun intended again! -- and then got to work on the back half of the window.) Since this overlapping bit is in the way of removing the center stops, the only thing I could think of was to rip it off the window...


6) After the overhanging piece comes off, you can remove the center stops. The picture below makes it look like I just pulled out the stops, but in reality I had to use the pry bar and the hammer to get it loose. But hey, maybe your stops will just lift right out, like magic! :o)


(See the hole where the stop was located?)

7) This step will be familiar: It's time to loosen the second set of springs. Since the back half of the double-hung window was up, I first loosened the bottom left and bottom right springs. Again, there are nails on the front and back of the spring, and you want to mangle things as little as possible.


The bottom springs are free. Next you have to open the window (in this case, it opens downward), forcing the window over the freed springs, so that you have access to the upper half of the springs. Loosen them up then yank out the window.

 In the above picture, I've only opened the window about a third of the way. You can see the rest of the front spring (on the bottom half of the window) that I need to loosen. After some serious effort, I got the window almost all the way opened and was able to remove the spring from the woodwork on the bottom.
 At this point, it doesn't matter if you mangle the spring. Just get it free from the frame!

4) After you loose both of the bottom sides, you can start pulling the window out of the frame. On this window, I'd mostly ripped the springs off of the nail heads, leaving many of them buried in the frame. This made it a bit more difficult to pull out the window, as it got caught on the nail heads. But I carefully worked it forward until the window came out. (Okay, I probably gave it a few good, violent tugs when it was really stuck.) The key is to make sure that all of the nails holding down the spring were removed -- even one still-attached nail will really make things difficult!


Great! Now that the front pane of the double-hung window has been removed, here is the window frame:

The next step is to remove the "stops" in the middle of the window.

5) I ran into something new with this window: The "back" half of the window (the back pane, pun intended) had a section that overlapped the center stops. (On bedroom windows, there wasn't an overlapping piece. We just pulled out the stops -- pun intended again! -- and then got to work on the back half of the window.) Since this overlapping bit is in the way of removing the center stops, the only thing I could think of was to rip it off the window...


6) After the overhanging piece comes off, you can remove the center stops. The picture below makes it look like I just pulled out the stops, but in reality I had to use the pry bar and the hammer to get it loose. But hey, maybe your stops will just lift right out, like magic! :o)


(See the hole where the stop was located?)

7) This step will be familiar: It's time to loosen the second set of springs. Since the back half of the double-hung window was up, I first loosened the bottom left and bottom right springs. Again, there are nails on the front and back of the spring, and you want to mangle things as little as possible.


The bottom springs are free. Next you have to open the window (in this case, it opens downward), forcing the window over the freed springs, so that you have access to the upper half of the springs. Loosen them up then yank out the window.

Ta-da! Both halves of the double-hung window are free.
8) In addition to the side stops that we took out in step 6, there is usually also an upper stop. Depending on the configuration of your window, you might have to remove the upper stop before you can take out the back half of your window. In this tutorial, I'm suggesting that you remove the top stop now, as step 8. But take a look at your window -- you might have to change the order of these instructions and do step 6, step 8, step 7, step 9. However it works out, the top center stop needs to come out.


9) Our windows also had metal strips at the top and bottom which I'm going to refer to as flanges. To take out the top flange, we definitely had to first remove the top center stop; the bottom flange could have been removed a couple of steps ago. Again, however it works for you, these pieces need to be removed. Carefully work that pry bar under the flange and get it loose. BUT BE AWARE: There's another set of stops in the window, the front stops. These should not be removed. If your top flange is like mine, it's tucked under the front stop, so you have to be careful when loosening the flange -- you don't want to remove the front stop.


The bottom flange on our window is tucked under a little piece of trim. For this window removal, we decided to remove this block of trim. (When we did the bedroom windows, we did not remove the block.) Whether or not you need to remove the block will depend entirely on your window configuration.


Here's the bottom of the window, with the metal flange and trim piece removed:

(We also had storm windows on our house. I didn't detail removing the storm windows. For us it was as easy as using the drill to remove a half dozen screws, but I don't know enough about storm windows to say if that's always the way of things.)
Here's the window opening, now that we've removed the trim, the front springs and window, the center stop, and the back springs and window. Note that the front stops are still in place -- you don't want to take those out!

You need to do a little cleanup at this point, before installing the new window. I'm planning to repaint all of the trim, so this is a very good time to do all of the sanding and prep work. I suppose if you have enough time and don't mind a gaping hole in the house, you could put a fresh coat of primer on the window frame as well. But if you're not making many changes, then just dust out the sill and continue the installation.
(You can see the front stops better in the picture below. I'd like to note for the umpteenth time that those don't come out! Can you tell we maybe learned this the hard way on one of our windows? Whoops.)

Whether or not you're planning to paint, you might still need to do some other work to get the frame ready for the new window. When I ripped the springs out, a lot of the nail heads stayed in the frame (the spring just pulled out around the nail head.) For the most part, I couldn't get the nails out of the frame, so I just grabbed a nail driver and pounded them deep into the wood.

I don't know a whole lot about installing windows. I know how to slide a vinyl window into a square, level hole and drill it into place. If the window frame is imperfect or the window is complicated, I don't have any advice. But here's a quick overview of how I installed this vinyl window:
10) Put the new window in the opening. If it's a snug fit, this might require a bit of muscle and some prayers. (My biggest fear with window replacements is ordering a window that's too large. Obviously we'd figure out how to make the frame wider and get it all to work, but oh gosh, I don't ever want to have that headache.) The new window will press against those front stops that I've continually warned you to not touch. The front stops keep the window from falling out of the frame! Before you screw the window in place, use your level to make sure it's level and plumb.
When we ordered the windows for the bedroom, we measured incorrectly and ended up with windows that were about half an inch smaller than the opening. This left a wide gap at the top of the window -- arg!!! We used low-expanding spray foam insulation to seal the top of the window. On both the outside and inside we then had to add a piece of trim wood in order to cover up the gap and the foam. It was a royal pain. The lesson: Make sure you measure correctly. If you don't know how, get help.
We learned our lesson (it was because of that danged block of trim wood along the bottom of the window that we measured wrong on the bedroom windows), and the bathroom window is perfect. So let's get back to it...
11) These windows came with holes pre-drilled in the vinyl. But the top holes were in the wrong place. Whoops to the manufacturer. So we had to add holes on the top. Some windows (the bedroom) don't come with any pre-drilled holes. Also, the placement of the holes will vary depending on whether it's a double-hung or single-hung window.
For this window, as I said, I had to add holes to the top. First I used my 1/8" bit to drill through the vinyl and into the wood frame. These windows have two layers of vinyl, with an air pocket in between.

12) If you were to put a screw in the window at this point, the head of the screw would be in the way of the window opening and closing. So I used a bigger drill bit to make the hole wider through the first layer of vinyl. This is important. You want the hole in the first layer of vinyl to be large enough for the head of the screw to pass through it, so that the screw head rests on the second layer of vinyl. (The screw should be "nested" between the layers of vinyl.)

13) Install your screws. For this window, I just put one screw on each side of the top and bottom. (In the bedroom, which has bigger windows, we also did a screw in the middle of the frame.)

The bedroom windows came with nice, little white covers that go over the screw holes; these windows did not come with the little plastic covers. Next time I am at the hardware store I am going to see if I can find some of them for this window. They add a nice finishing touch.
14) Now that the new window is installed, it's time to do the finishing work. Insulate, if needed. Definitely caulk, inside and out. (Re)install trim. Paint.

In the above picture, I haven't completed step 14. :o)
Saturday, April 7, 2012
More book reviews, baby news, and other happenings
I mentioned a couple weeks ago that I was reading The Help. Well I'm finished, and I liked it. The book is mostly about a group of women who are trying to write a book, so that makes it weird (the book-in-a-book thing), and at times it was a little slow. But it's well written and explores some great ideas, and it has a lot of substance. Lots of thoughtful detail. I was, however, upset and very disappointed by one of the events that happened at the end of the book. I don't want to spoil it so I won't go in to detail, but I am curious to know how other people felt about the book and especially the ending. (Mom? Grandma?)
I also watched the movie version of The Help, after I finished the book. It was good but not great. In some ways it fell a bit flat, in my opinion. I think it's always hard to really capture a book in a movie, when the book let's you see inside people's heads and has more time to really lay things out. I feel that a lot of the nuance was lost in the movie, and thus it was not as deep or fulfilling.
This week I read Water for Elephants. Ugh, I do not recommend it. The author set out to write a book about old-school circuses, the type that traveled by train (circa 1930). The author did a great job portraying that rich, varied, wild world of the train circus. The premise of the story that overlays the setting is good; the actual story, however, is... well... at times, it's abruptly, needlessly and uncomfortably sexual. There's really only one "sex scene" in the book, but there are a lot of sudden references to sex or sexual things. I think if that trash were stripped (no pun intended) from the story, it would be a really good book. As is, I can't give it my recommendation.
We got a new cookbook last month, Slow Cooker Revolution (by America's Test Kitchen). Like most normal people, we love slow-cooker recipes because you throw a bunch of food in a pot, ignore it for 4-8 hours, then eat. It's easy. Unfortunately, that is NOT the case with these recipes. They frequently require you to mix, cook, brown, microwave, etc. ingredients before they go in the slow cooker. Some of them have a bunch of steps after the hours of slow cooking. So far we've cooked four recipes. They have all been pretty tasty, but they are not especially quick or easy.
I was just flipping through old posts, and apparently I haven't mentioned that we had the tree in our backyard chopped down! After going round and round about it, we finally hired a tree service. It's not too expensive if they just lop off all of the branches and leave them in the yard. (The expensive part is if you make them grind out the stump, chop up the limbs, and haul away the mess. That takes awhile and they charge by the hour.)


The final picture is weird -- there's a tree directly behind our old tree and it's about the same size, so in some ways it feels like the tree isn't even missing!
Our neighbor wanted the wood, so he came over and helped Nate chop up the bigger limbs last weekend. Both of the boys had their chainsaws out and it was fun to watch them working. After they wrapped up I told Nate how much I enjoyed the dual chainsawing music. He asked if it sounded like a duet; I said it was more of a cacophony. Judge for yourself:
***
Now there are a few big piles of slash that need to go to the in-laws' house for burning. Nate took two truckloads over there today; there's probably three or four loads to go.
The old tree was a pine tree, yuck! In case you're not familiar with pine trees, they are very messy (constantly dropping tons of pine needles, which cover everything, and they are sticky) and they are not very attractive. They are gnarly and difficult. So for those reasons, I am happy the tree is gone. It also blocked part of our view on the back side of the house -- now that it's down, we can see a little bit more of the skyline, the city lights, and the mountains. What's more, Ugly Tree was right next to the area where we want to plant our garden this summer, and it blocked nearly all of the sunlight from reaching that area. After we get the slash moved we can till the ground, then put in some nice top soil. I still need to go a lot of planning before we can plant. There are a lot of things I would like to can next fall, and a lot of things I want to grow so we can eat them fresh, but I have to figure out how much time I will have for canning, then how much I will need to grow in order to can it, and so forth. My mom offered to help by giving us seeds and getting some of the seedlings started, so that will be awesome. Hopefully they will move to the area by the summer time and we can garden together.
Moving on to the wee little babe: She is crawling!!! She started crawling last Saturday, a week ago today. We went to the grocery store early in the morning, came home and sat down to watch General Conference, and ta-da! She took her first shuffly little crawls. It was amazing. I posted a video on Facebook that shows one of her first crawls. During the last week she's improved significantly and is really starting to travel around the house. It's awesome! I'm glad we took time last month to make our house safer for the baby, although I see now there's more work to do. Then again, my neighbor reminded me last week that it's also important to teach the baby no to go into certain places or do certain things. She recommended that we make the house baby safe but not baby proof, and use the opportunity to teach our daughter. Good point. Will do.
Baby Girl also has two top teeth! I know I mentioned them three weeks ago, after an awful night of teething-related suffering for the whole family, but now they are really starting to show and it's neat. Of course, her face seems less babyish with four teeth in her mouth, so that's a little sad. The front teeth look to be big and are gapped.... so she's not getting the best of our genetics. (Sorry kiddo :o)
Yesterday (Friday) we went to Darling's nine month checkup (yes, I realize that she's closer to 10 months now... wow!). She is 75th percentile for her height, weight, and head circumference. It's the first time she's been totally in proportion -- usually some part of her is up at at the 90th and another part is average. She got one shot at the appointment. We thought she wasn't going to have any, so we didn't pre-drug her with Infant's Advil. Nevertheless, she did great. Amazing, really. I was very proud! She let out one big scream and started to cry, but I scooped her up and she stopped. And apparently she was fine. Wow. An unexpected blessing. Maybe we won't pre-drug her for her next appointment? Hmm. I think she has to get three or so shots at the 12 month checkup, so then again, maybe I will give her a little dose.
At the appointment, our pediatrician asked if she's sleeping through the night. As you already know, she's not! He said that we should start to let her cry it out at night when we first put her down, and that if we do she will sleep better at night. But we don't have to start until until we're (I'm) ready. Ha. I don't think I will ever be ready. He also said she needs to be having more solid food; she should be eating three little solid meals a day, and getting as much as half of her calories from solids. We're trying, have been trying. She's only just decided that she's willing to drink from a cup, so we have a couple of starter sippy cups including one with a straw and she will take one or two ounces from the cup, and maybe as much as a tablespoon of solid food. She's pretty good about eating dinner with us, but refuses solids at breakfast. I've been trying for weeks, and I will keep trying. At the same time, I don't mind that she's still nursing. Sure it's not always the most convenient, and biting has been a problem with the new teeth, but I like the cuddle time and the bonding. I also like that I can eat large portions of food and not worry very much about my weight. :o)
This morning we took Darling to the neighborhood Easter Egg hunt. She's too little to participate, so we helped her grab one egg and then said goodbye (it was right at naptime). There were actually only a couple of neighborhood families at the hunt; the other families were all friends of the couple who hosted the event. It was a tad awkward, since we didn't know anyone but they all seemed to know each other.
Finally, a lovely reminder of the joy we celebrate at Easter:

P.S. I've switched to the new version of Blogger, and for the most part it's good. There are some really great features -- it's easier to upload, size and organize pictures, for one thing. The layout is much cleaner. But it also has some glitches. For instance, I think it dropped a blog post...? I wrote a couple of paragraphs earlier this week then saved the draft, but now I can't find the draft! I'm sure the issues will get worked out, and I think the improvements are worth the cost, but I am a little disappointed about those missing paragraphs.
I also watched the movie version of The Help, after I finished the book. It was good but not great. In some ways it fell a bit flat, in my opinion. I think it's always hard to really capture a book in a movie, when the book let's you see inside people's heads and has more time to really lay things out. I feel that a lot of the nuance was lost in the movie, and thus it was not as deep or fulfilling.
This week I read Water for Elephants. Ugh, I do not recommend it. The author set out to write a book about old-school circuses, the type that traveled by train (circa 1930). The author did a great job portraying that rich, varied, wild world of the train circus. The premise of the story that overlays the setting is good; the actual story, however, is... well... at times, it's abruptly, needlessly and uncomfortably sexual. There's really only one "sex scene" in the book, but there are a lot of sudden references to sex or sexual things. I think if that trash were stripped (no pun intended) from the story, it would be a really good book. As is, I can't give it my recommendation.
We got a new cookbook last month, Slow Cooker Revolution (by America's Test Kitchen). Like most normal people, we love slow-cooker recipes because you throw a bunch of food in a pot, ignore it for 4-8 hours, then eat. It's easy. Unfortunately, that is NOT the case with these recipes. They frequently require you to mix, cook, brown, microwave, etc. ingredients before they go in the slow cooker. Some of them have a bunch of steps after the hours of slow cooking. So far we've cooked four recipes. They have all been pretty tasty, but they are not especially quick or easy.
I was just flipping through old posts, and apparently I haven't mentioned that we had the tree in our backyard chopped down! After going round and round about it, we finally hired a tree service. It's not too expensive if they just lop off all of the branches and leave them in the yard. (The expensive part is if you make them grind out the stump, chop up the limbs, and haul away the mess. That takes awhile and they charge by the hour.)


The final picture is weird -- there's a tree directly behind our old tree and it's about the same size, so in some ways it feels like the tree isn't even missing!
Now there are a few big piles of slash that need to go to the in-laws' house for burning. Nate took two truckloads over there today; there's probably three or four loads to go.
The old tree was a pine tree, yuck! In case you're not familiar with pine trees, they are very messy (constantly dropping tons of pine needles, which cover everything, and they are sticky) and they are not very attractive. They are gnarly and difficult. So for those reasons, I am happy the tree is gone. It also blocked part of our view on the back side of the house -- now that it's down, we can see a little bit more of the skyline, the city lights, and the mountains. What's more, Ugly Tree was right next to the area where we want to plant our garden this summer, and it blocked nearly all of the sunlight from reaching that area. After we get the slash moved we can till the ground, then put in some nice top soil. I still need to go a lot of planning before we can plant. There are a lot of things I would like to can next fall, and a lot of things I want to grow so we can eat them fresh, but I have to figure out how much time I will have for canning, then how much I will need to grow in order to can it, and so forth. My mom offered to help by giving us seeds and getting some of the seedlings started, so that will be awesome. Hopefully they will move to the area by the summer time and we can garden together.
Moving on to the wee little babe: She is crawling!!! She started crawling last Saturday, a week ago today. We went to the grocery store early in the morning, came home and sat down to watch General Conference, and ta-da! She took her first shuffly little crawls. It was amazing. I posted a video on Facebook that shows one of her first crawls. During the last week she's improved significantly and is really starting to travel around the house. It's awesome! I'm glad we took time last month to make our house safer for the baby, although I see now there's more work to do. Then again, my neighbor reminded me last week that it's also important to teach the baby no to go into certain places or do certain things. She recommended that we make the house baby safe but not baby proof, and use the opportunity to teach our daughter. Good point. Will do.
Baby Girl also has two top teeth! I know I mentioned them three weeks ago, after an awful night of teething-related suffering for the whole family, but now they are really starting to show and it's neat. Of course, her face seems less babyish with four teeth in her mouth, so that's a little sad. The front teeth look to be big and are gapped.... so she's not getting the best of our genetics. (Sorry kiddo :o)
Yesterday (Friday) we went to Darling's nine month checkup (yes, I realize that she's closer to 10 months now... wow!). She is 75th percentile for her height, weight, and head circumference. It's the first time she's been totally in proportion -- usually some part of her is up at at the 90th and another part is average. She got one shot at the appointment. We thought she wasn't going to have any, so we didn't pre-drug her with Infant's Advil. Nevertheless, she did great. Amazing, really. I was very proud! She let out one big scream and started to cry, but I scooped her up and she stopped. And apparently she was fine. Wow. An unexpected blessing. Maybe we won't pre-drug her for her next appointment? Hmm. I think she has to get three or so shots at the 12 month checkup, so then again, maybe I will give her a little dose.
At the appointment, our pediatrician asked if she's sleeping through the night. As you already know, she's not! He said that we should start to let her cry it out at night when we first put her down, and that if we do she will sleep better at night. But we don't have to start until until we're (I'm) ready. Ha. I don't think I will ever be ready. He also said she needs to be having more solid food; she should be eating three little solid meals a day, and getting as much as half of her calories from solids. We're trying, have been trying. She's only just decided that she's willing to drink from a cup, so we have a couple of starter sippy cups including one with a straw and she will take one or two ounces from the cup, and maybe as much as a tablespoon of solid food. She's pretty good about eating dinner with us, but refuses solids at breakfast. I've been trying for weeks, and I will keep trying. At the same time, I don't mind that she's still nursing. Sure it's not always the most convenient, and biting has been a problem with the new teeth, but I like the cuddle time and the bonding. I also like that I can eat large portions of food and not worry very much about my weight. :o)
This morning we took Darling to the neighborhood Easter Egg hunt. She's too little to participate, so we helped her grab one egg and then said goodbye (it was right at naptime). There were actually only a couple of neighborhood families at the hunt; the other families were all friends of the couple who hosted the event. It was a tad awkward, since we didn't know anyone but they all seemed to know each other.
Finally, a lovely reminder of the joy we celebrate at Easter:
P.S. I've switched to the new version of Blogger, and for the most part it's good. There are some really great features -- it's easier to upload, size and organize pictures, for one thing. The layout is much cleaner. But it also has some glitches. For instance, I think it dropped a blog post...? I wrote a couple of paragraphs earlier this week then saved the draft, but now I can't find the draft! I'm sure the issues will get worked out, and I think the improvements are worth the cost, but I am a little disappointed about those missing paragraphs.
Subscribe to:
Comments (Atom)